1: Select your site type and update the website description. This should be 1-2 sentences about your site and include basic information such as your site title, your name, and what you do.
2 : Set titles on EVERY page. On every page you create, you will have the option to input a navigation title, page title and page description. Here’s what those things are:
Navigation Title: Shows up on the menu bar of your site (usually in the header/footer)
Page Title: Add more details in this description as this is what is pulled when search engines crawl your site for matching keywords
Description Box: This is optional as some templates display what you write and others do not. You don’t necessarily need to fill this out if you don’t want your description showing up on your site, but if it doesn’t show up on your site a little more description of your site won’t hurt when the search engines go a-lookin’.
3 : Set up your SEO Backend. Updating the SEO backend will provide search engines with the necessary information to pull keywords from your site that match the keyword search done by potential clients and site visitors!
From the Home page, head to Marketing > SEO
Fill out the Site Title and Site Meta Description fields - this is CRUCIAL to do. This step tells the search engines the name of your site, and when search engines scan site information for keywords being searched, what pops into your site description is what will pop up in the preview if it’s a great match to the keyword search.
You’ll be able to see how this shows on a search engine result page such as Google in the “Search Results Preview” box right below the data input boxes
You can further adjust how your site information displays by selecting “Advanced” to adjust how your site appears on search engine results as far as “Page Title - Site Title” or vice versa, however I recommend keeping it as is.
4 : Secure Your Site. Search engines LOVE secure sites, so locking down the SSL is crucial in boosting your search result rankings. SSL stands for Secure Sockets Layer, and basically it ensures that the connection between your browser and the site is secure. So not only is it important to update the security of your site for rankings sake - you provide your site visitors with peace of mind that your site is safe and authentic.
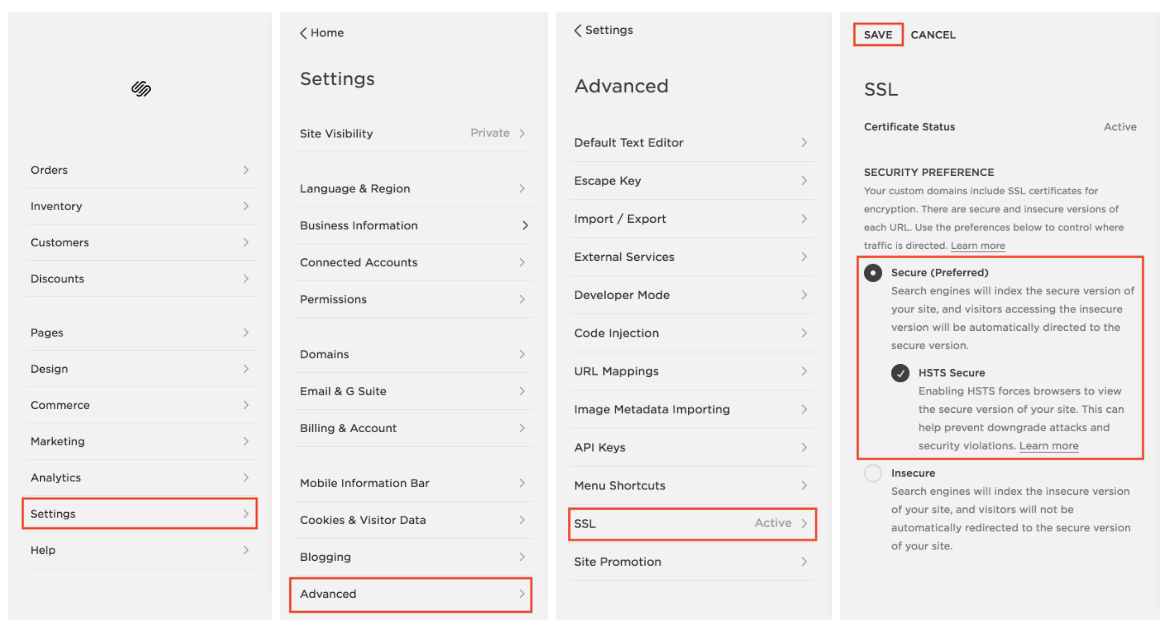
From the Home page head to Settings > Advanced > SSL (you might have to scroll down to see “Advanced” pop up)
Under “Security Preferences” make sure Secure (Preferred) is selected, and then click the button to check HSTS Secure as well
Click “Save”
5 : Optimize Images for SEO. When search engine scan through sites, they essentially “read” through everything - except when it comes to pictures. However, you can allow them to “read” your picture by including the appropriate file names and captions on the photos you upload to your website. This way, search engine can “read” your image file name/title, pull it and allow your site to show up higher on the search results if the keywords match.
Here are the 2 steps to optimize your images:
Name the image file when you save the file, BEFORE you upload it to your website. So instead of uploading the image file “img123” it might say “3 Nights in Marrakech Blog Post” (say if you were a travel blogger). This is way more detailed and will allow for better ranking results for your site if someone were to Google “3 Nights in Marrakech.”
Fill out the “File Name - Optional” Box. You can use the same description as your detailed file name, but I would also recommend including your name and your site name (or blog name in this instance). If you’re utilizing Pinterest, it will also allow it to show up on Pinterest as well. This file name what Google is primarily looking at and part of how it selects the order in which sites show on the results page. Make sure to hit Apply at the end!
BONUS: Clean Up Your “Not Linked” Section
Disable pages you want to keep but aren’t using - this ensures the search engine doesn’t find it in its scan
Delete pages you won’t need again to create less clutter and a more organized back end for you and the search engine
Add a password to pages that are private you don’t want search engines to crawl through


